
Protocol means "an official standard for handling given situations." As embedded developers, when we hear the word "protocol," we most often think of a communication protocol, or a set of rules by which devices communicate with each other. Communication protocols are ubiquitous, from the low-level ones within a PCB (I2C, SPI, UART) to network protocols (TCP, UDP) to high-level ones (JSON-RPC). In this article, we will show you how to add support for our own protocol to Wireshark - we will write a plugin in Lua, which will be used to decode message frames. Get to it!
In the work of an embedded programmer, more than once we create our own protocols, then implement them, only to later spend many hours looking for why the communication does not work. Debugging inter-device communication is a constant part of our work, so it's worth using tools that make this job easier.
While at the lowest level a logic state analyzer is often enough, at higher values and with more complex communications it is worth reaching for other tools. One of the best tools for analyzing network protocols is Wireshark. We usually associate it with analyzing TCP/IP network traffic, but in practice we can also use its advanced interface to analyze other protocols, including our own protocols.
In this article, we will show how to add support for our own protocol to Wireshark - we will write a plugin in Lua that will be used to decode message frames. Get to it!
Sample protocol
// excom proto - EXample COMmunication Protocol
#pragma once

#include <stddef.h>
#include <stdint.h>
#include <stdbool.h>

#define __packed __attribute__((__packed__))

enum RequestType {
    REQ_DISPLAY = 1,
    REQ_LED = 2,
};

typedef struct  {
    uint32_t text_length;
    char text[];
} __packed display_request_t;

typedef struct {
    uint16_t id;
    bool state;
} __packed led_request_t;

typedef union {
    display_request_t display;
    led_request_t led;
} __packed request_data_t;

typedef struct {
    uint32_t id;
    uint8_t type;
    request_data_t data;
} __packed request_t;

typedef struct {
    uint32_t id;
    bool status;
} __packed response_t;

#define REQUEST_BASE_SIZE (sizeof(request_t) - sizeof(request_data_t))
Assume that the communication is between two devices:
- client - sends request_t and expects response_t;
- server - expects request_t, processes the request and sends back the response_t;
- display_request_t - display text on the display;
- led_request_t - change of state of the diode;
Test application
While we could implement our protocol on real devices, for the purpose of this article we will simulate it on a PC. In this article, we will use the TCP protocol as the transport layer (OSI model) for our excom protocol (application layer). This will greatly simplify testing our protocol in Wireshark at first. In the next article, we will show how to easily modify our solution to omit TCP or use another lower layer protocol.
- excom_client.c
- sends another display_request_t with the text snprintf(..., "Hello world %zu!", i) until a response_t with status true is received
- then sends a series of led_request_t for id in the range [0, 42)
- excom_server.c
- in loop reads request_t and sends response_t, response_t.status sets to true only in every 42 packets
A link to the full code is available from the sources [1].
# Terminal 1
socat -x TCP-LISTEN:9000,reuseaddr,fork EXEC:./excom_server.elf
# Terminal 2
socat -x TCP:localhost:9000 EXEC:./excom_client.elf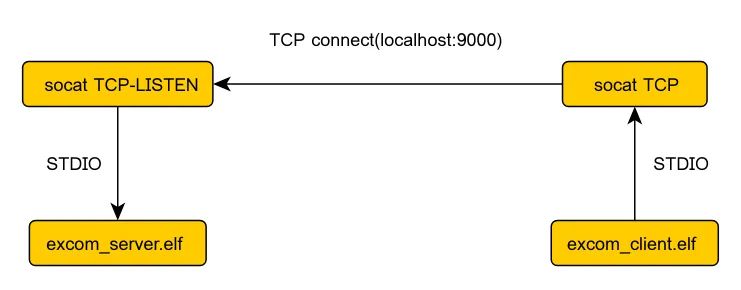
$ socat -x TCP-LISTEN:9000,reuseaddr,fork EXEC:./excom_server.elf
> 2024/04/22 11:09:37.000217666  length=23 from=0 to=22
 01 00 00 00 01 0e 00 00 00 48 65 6c 6c 6f 20 77 6f 72 6c 64 20 30 21
< 2024/04/22 11:09:37.000217760  length=5 from=0 to=4
 01 00 00 00 00
> 2024/04/22 11:09:37.000217877  length=23 from=23 to=45
 02 00 00 00 01 0e 00 00 00 48 65 6c 6c 6f 20 77 6f 72 6c 64 20 31 21
< 2024/04/22 11:09:37.000217934  length=5 from=5 to=9
 02 00 00 00 00
First steps with Wireshark
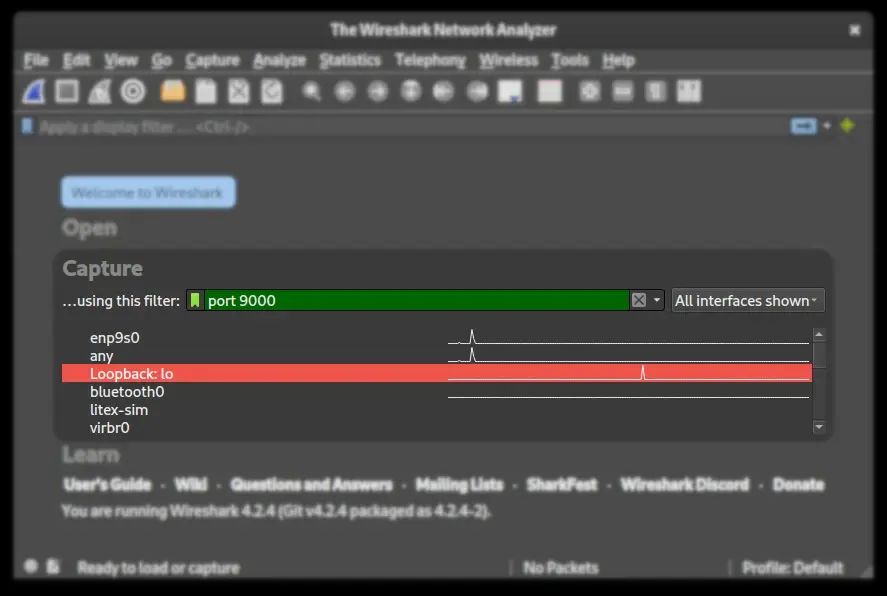
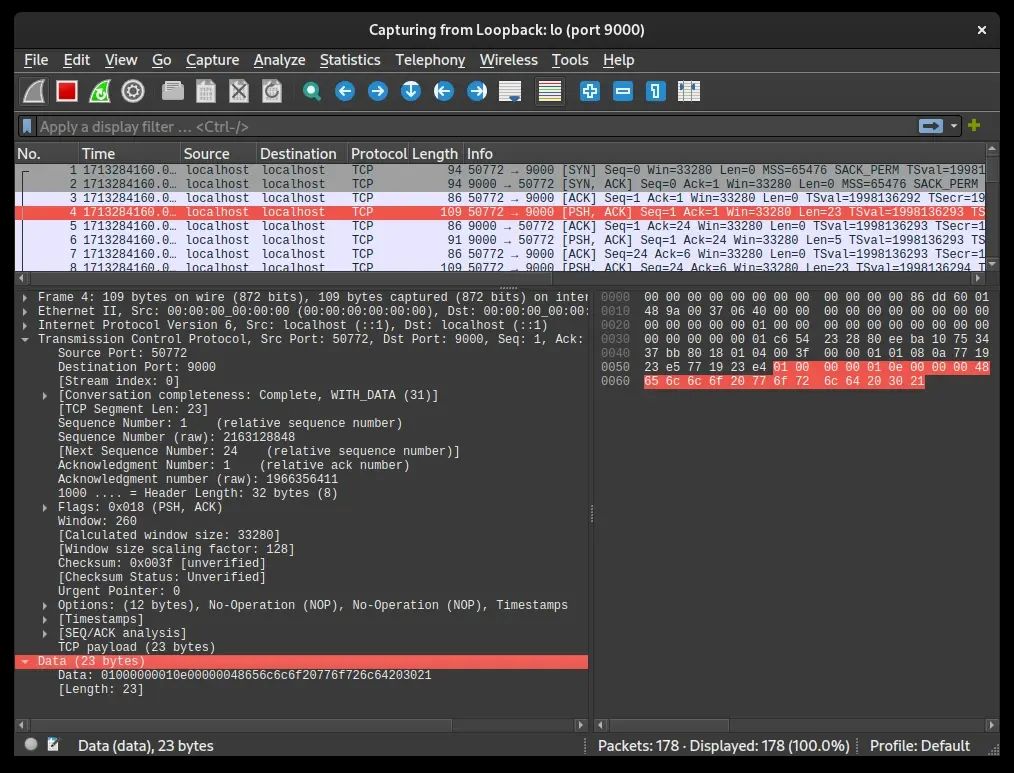
With the environment prepared, we can launch Wireshark to eavesdrop on the communication between the excom_server.c a excom_client.c.
Protocol Dissector
Wireshark uses so-called dissectors to analyze received packets. The dissector parses the data according to a given protocol, after which it can pass some of the data to dissectors of other protocols. While Wireshark has built-in support for most popular protocols, it certainly doesn't know about ours yet. Fortunately, it is possible to add your own dissectors as "plugins" to Wireshark. We can define such a plugin in the Lua scripting language and load it dynamically at Wireshark startup.
Lua is a lightweight scripting language designed to be embedded in other programs. The language itself offers great possibilities, despite its simple syntax, only 8 data types and a few quirks (indexing from 1!). If you haven't encountered it before, for our purposes, it's enough to familiarize yourself with Learn Lua in Y minutes [3] without sections 3.1 and 4. More detailed information can be found on the official website [4].
wireshark -X lua_script:excom_protocol.lua -k -i lo -f 'port 9000'To begin with, let's define the initial implementation of the dissector:
-- Our protocol object
excom_proto = Proto('excom-proto', 'EXample COMmunication protocol')

-- Helper function for ProtoField names
local function field(field_name)
    return string.format('%s.%s', excom_proto.name, field_name)
end

-- RequestType enum
local request_type = {
    REQ_DISPLAY = 1,
    REQ_LED = 2,
}
-- Mapping of RequestType value to name
local request_type_names = {}
for name, value in pairs(request_type) do
    request_type_names[value] = name
end

-- Define field types available in our protocol, as a table to easily reference them later
local fields = {
    id = ProtoField.uint32(field('id'), 'Request ID', base.DEC),
    -- request_t
    type = ProtoField.uint8(field('type'), 'Request type', base.HEX, request_type_names),
    -- response_t
    status = ProtoField.bool(field('status'), 'Response status'),
}

-- Add all the types to Proto.fields list
for _, proto_field in pairs(fields) do
    table.insert(excom_proto.fields, proto_field)
end

-- Dissector callback, called for each packet
excom_proto.dissector = function(buf, pinfo, root)
    -- arguments:
    -- buf: packet's buffer (https://www.wireshark.org/docs/wsdg_html_chunked/lua_module_Tvb.html#lua_class_Tvb)
    -- pinfo: packet information (https://www.wireshark.org/docs/wsdg_html_chunked/lua_module_Pinfo.html#lua_class_Pinfo)
    -- root: node of packet details tree (https://www.wireshark.org/docs/wsdg_html_chunked/lua_module_Tree.html#lua_class_TreeItem)

    -- Set name of the protocol
    pinfo.cols.protocol:set(excom_proto.name)

    -- Add new tree node for our protocol details
    local tree = root:add(excom_proto, buf())

    -- Extract message ID, this is the same for request_t and response_t
    -- `id` is of type uint32_t, so get a sub-slice: buf(offset=0, length=4)
    local id_buf = buf(0, 4)
    tree:add_le(fields.id, id_buf)

    -- request_t
    local type_data = buf(4, 1)
    tree:add_le(fields.type, type_data)
end

-- Register our protocol to be automatically used for traffic on port 9000
local tcp_port = DissectorTable.get('tcp.port')
tcp_port:add(9000, excom_proto)Wireshark loads the API definitions that will be available as global variables before loading our file. A description of the available API can be found on Wireshark's official Lua API Reference Manual page [5].
# Terminal 1
wireshark -X lua_script:excom_protocol.lua -k -i lo -f 'port 9000'
# Terminal 2
socat -x TCP-LISTEN:9000,reuseaddr,fork EXEC:./excom_server.elf
# Terminal 3
socat -x TCP:localhost:9000 EXEC:./excom_client.elf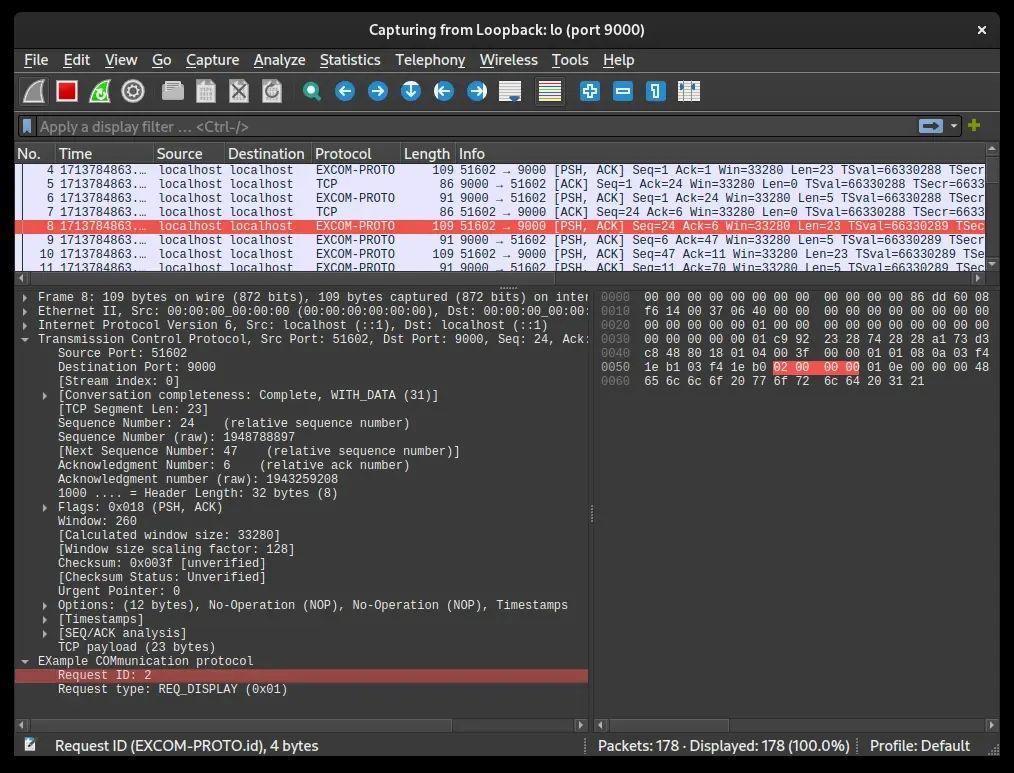
Success! We are now able to decode the fields of our protocol, now it's time to add the rest of the logic.
Full code available below in sources [6].
Decoding responses
local server_port = 9000

excom_proto.dissector = function(buf, pinfo, root)
    local tree = root:add(excom_proto, buf())

    local id_buf = buf(0, 4)
    tree:add_le(fields.id, id_buf)

    if pinfo.dst_port == 9000 then
        -- request_t
        local type_data = buf(4, 1)
        tree:add_le(fields.type, type_data)
    else
        -- response_t
 tree:add_le(fields.status, buf(4, 1))
    end
endlocal fields = {
id = ProtoField.uint32(field('id'), 'Request ID', base.DEC),
-- request_t
type = ProtoField.uint8(field('type'), 'Request type', base.HEX, request_type_names),
-- response_t
status = ProtoField.bool(field('status'), 'Response status'),
-- display_request_t
display_text_length = ProtoField.uint32(field('display.text_length'), 'Text length', base.DEC),
display_text = ProtoField.string(field('display.text'), 'Text', base.ASCII),
-- led_request_t
led_id = ProtoField.uint16(field('led.id'), 'LED ID', base.DEC),
led_state = ProtoField.bool(field('led.state'), 'LED state'),
}
excom_proto.dissector = function(buf, pinfo, root)
local tree = root:add(excom_proto, buf())
local id_buf = buf(0, 4)
tree:add_le(fields.id, id_buf)
if pinfo.dst_port == server_port then
-- request_t
local type_data = buf(4, 1)
tree:add_le(fields.type, type_data)
-- request_data_t depending on the `type` field
local type = type_data:le_uint()
if type == request_type.REQ_DISPLAY then
-- display_request_t
local len_buf = buf(5, 4)
tree:add_le(fields.display_text_length, len_buf)
tree:add_le(fields.display_text, buf(9, len_buf:le_uint()))
elseif type == request_type.REQ_LED then
-- led_request_t
tree:add_le(fields.led_id, buf(5, 2))
tree:add_le(fields.led_state, buf(7, 1))
end
else
-- response_t
tree:add_le(fields.status, buf(4, 1))
end
end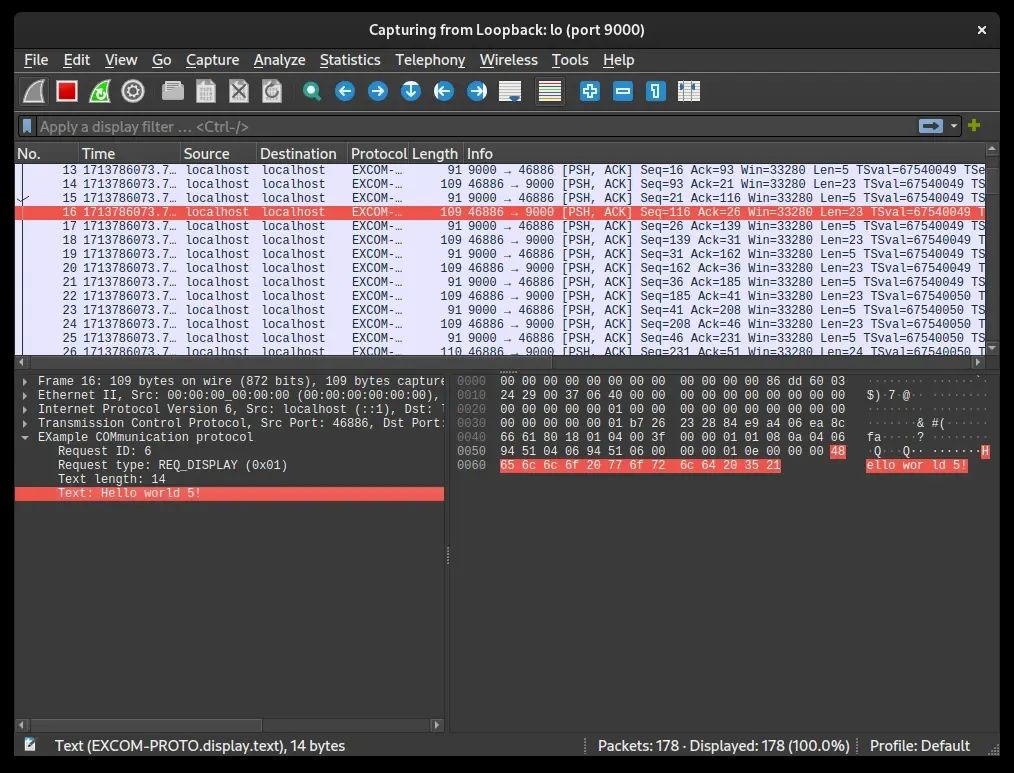
Full code available below from sources [7].
Request-response pairing
local fields = {
    -- (...)
    -- special fields to provide information about matching request/response
    request = ProtoField.framenum(field('request'), 'Request', base.NONE, frametype.REQUEST),
    response = ProtoField.framenum(field('response'), 'Response', base.NONE, frametype.RESPONSE),
}

-- Mappings of request/response ID to frame numbers
local id2frame = {
    request = {}, -- request id -> request frame number
    response = {}, -- response id -> response frame number
}

excom_proto.dissector = function(buf, pinfo, root)
    local tree = root:add(excom_proto, buf())

    local id_buf = buf(0, 4)
    tree:add_le(fields.id, id_buf)

    local id = id_buf:uint()

    if pinfo.dst_port == server_port then
        --- (...)

        -- On first dissection run (pinfo.visited=false) store mapping from request id to frame number
        if not pinfo.visited then
            id2frame.request[id_buf:uint()] = pinfo.number
        end

        -- If possible add information about matching response
        if id2frame.response[id] then
            tree:add_le(fields.response, id2frame.response[id])
        end
    else
        --- (...)

        if not pinfo.visited then
            id2frame.response[id_buf:uint()] = pinfo.number
        end
        if id2frame.request[id] then
            tree:add_le(fields.request, id2frame.request[id])
        end
    end
end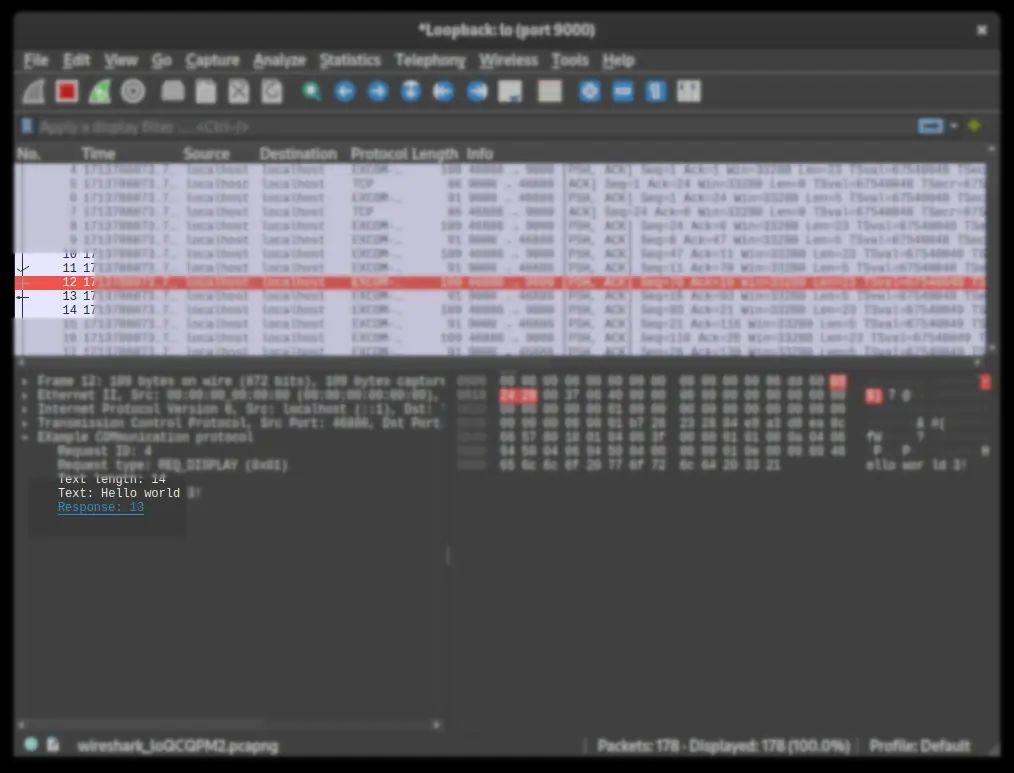
Full code available below from sources [8].
TCP packet assembly
# Terminal 1
wireshark -X lua_script:excom_protocol.lua -k -i lo -f 'port 9000'
# Terminal 2
socat -x TCP-LISTEN:9000,reuseaddr,fork EXEC:./excom_server.elf
# Terminal 3
socat -x TCP:localhost:9000 EXEC:./excom_spam_client.elf
Correct dissection using TCP requires us to perform the so-called "TCP Reassembly". We can find details on what to pay attention to on the Wireshark wiki [9].
-- Helper function for taking message data from buffer and configuring pinfo in case we need more data
local function msg_consumer(buf, pinfo)
    local obj = {
        msg_offset = 0, -- offset in buf to start of the current message
        msg_taken = 0, -- number of bytes consumed from current message
        not_enough = false,
    }

    obj.next_msg = function()
        obj.msg_offset = obj.msg_offset + obj.msg_taken
        obj.msg_taken = 0
    end

    obj.take_next = function(n)
        if obj.not_enough then -- subsequent calls
            return
        end

        -- If not enough data in the buffer then wait for next packet with correct offset
        if buf:len() - (obj.msg_offset + obj.msg_taken) < n then
            pinfo.desegment_offset = obj.msg_offset
            pinfo.desegment_len = DESEGMENT_ONE_MORE_SEGMENT
            obj.not_enough = true
            return
        end

        local data = buf:range(obj.msg_offset + obj.msg_taken, n)
        obj.msg_taken = obj.msg_taken + n
        return data
    end

    obj.current_msg_buf = function()
        return buf:range(obj.msg_offset, obj.msg_taken)
    end

    return obj
end
Now we can modify the dissector so that it parses all the messages found in the buffer, and when there is no data, it aborts and waits for more. In addition, we delay adding our protocol nodes to the tree so that "partial" messages are not added. The modified dissector code looks like this:
excom_proto.dissector = function(buf, pinfo, root)
    -- Construct TCP reassembly helper
    local consumer = msg_consumer(buf, pinfo)

    -- TCP reasasembly - loop through all messages in the packet
    while true do
        consumer.next_msg()

        -- Deferred adding of tree fields
        local tree_add = {}

        -- Extract request/response ID
        local id_buf = consumer.take_next(4)
        if not id_buf then
            return -- not enough data, take_next has configured pinfo to request more data
        end

        table.insert(tree_add, {fields.id, id_buf})
        local id = id_buf:uint()

        -- Distinguish request/response
        if pinfo.dst_port == server_port then
            -- request_t
            local type_buf = consumer.take_next(1)
            if not type_buf then
                return
            end

            table.insert(tree_add, {fields.type, type_buf})

            -- request_data_t depending on the `type` field
            local type = type_buf:le_uint()
            if type == request_type.REQ_DISPLAY then
                -- display_request_t
                local len_buf = consumer.take_next(4)
                local text_buf = len_buf and consumer.take_next(len_buf:le_uint())
                if not text_buf then
                    return
                end
                table.insert(tree_add, {fields.display_text_length, len_buf})
                table.insert(tree_add, {fields.display_text, text_buf})
            elseif type == request_type.REQ_LED then
                -- led_request_t
                local id_buf = consumer.take_next(2)
                local state_buf = consumer.take_next(1)
                if not state_buf then
                    return
                end
                table.insert(tree_add, {fields.led_id, id_buf})
                table.insert(tree_add, {fields.led_state, state_buf})
            end

            -- On first dissection run (pinfo.visited=false) store mapping from request id to frame number
            if not pinfo.visited then
                id2frame.request[id_buf:uint()] = pinfo.number
            end

            -- If possible add information about matching response
            if id2frame.response[id] then
                table.insert(tree_add, {fields.response, id2frame.response[id]})
            end
        else
            -- response_t
            local status_buf = consumer.take_next(1)
            table.insert(tree_add, {fields.status, status_buf})

            if not pinfo.visited then
                id2frame.response[id_buf:uint()] = pinfo.number
            end
            if id2frame.request[id] then
                table.insert(tree_add, {fields.request, id2frame.request[id]})
            end
        end

        -- Add tree node for this message only if we reached this place
        local tree = root:add(excom_proto, consumer.current_msg_buf())
        for _, to_add in ipairs(tree_add) do
            tree:add_le(to_add[1], to_add[2])
        end
    end
end
After using it to eavesdrop on messages sent by the excom_spam_client.c we should see:


